搬运自主站,是Unity及其他语言探索学习。
最近课题在做的MMESE分析,个人负责人内因,感觉挺有意思的,放个过程文件,等完善了再撤。.jpg)
.jpg)
交互相关@
Python@
腾讯会议自动登录@
原理:屏幕截图图像识别
Python生成exe文件:
安装pyinstaller工具:terminal输入:pip install pyinstaller
生成本项目可执行文件:Terminal中输入:pyinstaller -F -w main.py
GPT-2@
运行环境:
python3.6、 transformers==4.2.0、pytorch==1.7.0
scr:GPT2-Chinese
Decoders-Chinese-TF2.0
主要是想搞这个智能写作的玩意。
- Python在cmd中运行。
- 在地址栏上输入cmd即可在此处运行cmd。
- pip在cmd中输入。
- 配置系统环境变量,直接在win设置中搜索“环境变量”,按要求更改即可。
运行时在cmd输入以下命令:
1 | d: |
输入Python可进入Python命令行。
cmd中下载时需要输入:pip install transformers==4.3.3或直接pip3 install -r requirements.txt
pip没了就输入python -m ensurepip
或者直接在train.py右键用Pycharm运行。
报错:pytorch_lightning.utilities.exceptions.MisconfigurationException: You requested GPUs: [0]
But your machine only has: []
8.17 明明有两个GPU,非说我没有GPU。下了CUDA、Cudnn、Nvidia都解决不了,暂时搁置吧。
以备将来捡起来,怀疑是电脑问题,笔记本有两个GPU,第一个是Intel的,第二个是Nvidia的。该Nvidia显卡支持CUDA。根据查阅网络基本能确定是CUDA没有配置好的问题,但问题就是也能确定CUDA在正常运行,所以只能怀疑是因为Intel不支持CUDA,0又代表着第一个显卡,怀疑是这个问题。估计得换电脑。
这是Pycharm的结果,cmd运行会报找不到module
比较重要的一点是CUDA_VISIBLE_DEVICES这个环境变量。或许我让他=1就可以解决问题了。
如果在pycharm中调试时,可以打开Run/Debug Configurations,在Environment variables右边点击…处添加变量。
1 | import os |
或在命令行运行时CUDA_VISIBLE_DEVICES=1 python train.py --raw
Python命令行需要import torch
1 | import torch |
0
Pycharm中在Main后面输入:print(torch.__version__)
‘1.8.0+cpu’
print(torch.cuda.device_count())
0
print(torch.cuda.is_available())
false
print(pytorch_lightning.__version__)
‘1.2.2’
报错原因:
原代码中针对多卡情况指定了GPU ’1‘,而实际单卡情况下为’0‘。
解决办法:找到代码中如下语句,删除。
os.environ["CUDA_VISIBLE_DEVICES"] = '1'
或者
1 | import os |
只需要在代码中添加以上代码即可,需要说明的是,一定要加在文件的最顶部,再引入其他的深度学习库!
以下是正确的使用方法:
1 | import os |
以下是错误的使用方法:
1 | import paddle |
MadLibs@
Unity@
研究方向@
- 总结理论,完善虚实系统设计理论体系(/界面设计理论体系/可用性测试方案)
- 进一步学习MRTK(自定义界面风格(根据文献进行学习)、匹配功能实现、场景系统(Manager Scene等选项卡)、空间映射功能)
- 界面细节(元素空间位置、遮挡关系、透明度/亮度、颜色、大小)对虚实界面视觉效果影响 & 场景通用性/自适应性
- 利用新虚实系统模式/界面设计规避指针精确度/硬件设备人机学问题
- 与用户需求结合进行设计
8.28更新:
- 总结完善虚实系统设计理论体系
界面设计理论体系
可用性测试方案
- 继续学习MRTK(阅读文献)
自定义界面风格(界面视觉设计)
匹配功能实现(数据接口、函数等)
场景系统(Manager Scene等选项卡)
空间映射功能
串口和行为树
- 界面细节对虚实界面视觉效果影响
程序对该场景的通用性/自适应性
元素空间位置
遮挡关系
透明度/亮度
颜色
大小
…
- 规避指针精确度和硬件设备人机学问题
可利用新虚实系统模式/界面设计
- 与用户需求结合进行设计
视频远程指导(Microsoft Teams)
基于Vuforia的特征点注册
有空研究下Player,(Player.xxx)HoloLens涉及不到。
视觉效果和字号数字我没有关联上,需要实操。
Unity 2D(有的3D也适用)@
打包之后的传送门脚本失效了 去查了什么静态方法非静态方法,试了好多解决方案,结果发现就是因为那个挂载物体打了“editoronly”的标签
原来这些tag不是说着玩的啊!我还以为就是一个普通的标签!就一个备注!
窗口可调且可后台运行@
在Project Setting-Player-Resolution里,直接设置就行。
生成随机数@
musicCode = Random.Range(0, 3);
音频@
运行后如果没有声音需要检查以下几处:
1,Audio Source 的mute(静音)是否选中
2,scene窗口上方的mute调试按钮是否按下
3,game窗口上方的mute audio按钮是否按下
4,场景中是否存在一个以上的Audio Lisenner
调用系统时间@
1 | string str = System.DateTime.Now.ToString(); |
跨脚本调用方法@
【static使用方便;SendMessage方法比较灵活;GetComponent比较稳定】
关于SendMessage的更多参数(如何推送以及找不到函数是否报错)去查网上。
第一种,被调用脚本函数为static类型,调用时直接用 脚本名.函数名()【此方法会导致很多参数无法使用的问题,虽然方便但涉及复杂调用时不推荐】
第二种,GameObject.Find(“脚本所在的物体的名字”).SendMessage(“函数名”,参数,SendMessageOptions);//能调用public和private类型函数【零参单参成立,多参是不行的。多参需要定义object数组,之后在“函数名”中转换类型,大于3个参数时不如用第四种。】
1
2
3
4
5
6
7
8
9
10
11
12
13
14
15
16
17
18
19 object[] temp = new object[6];
temp[0] = boxLeft;
temp[1] = boxTop;
temp[2] = boxWidth;
temp[3] = boxHeight;
temp[4] = deep;
temp[5] = currentPos;
GameObject.Find("Line").SendMessage("drawBox",temp);
---
drawBox(object[] temp){
int o0 = (int)temp[0]
...
}
第三种,GameObject.Find(“脚本所在的物体的名字”).GetComponent<脚本名>().SendMessage(“函数名”,参数,SendMessageOptions); //可以添加参数【多参需要定义object数组,之后在“函数名”中转换类型,大于3个参数时不如用第四种。】
1 |
|
第四种,GameObject.Find(“脚本所在的物体的名字”).GetComponent<脚本名>().函数名(); //只能调用public类型函数
1 | GameObject.Find("Functions").GetComponent<recognizeDrawUI>().drawBoxUI(centrePos, objNumber); |
跨脚本传输参数+获取参数@
这句是按照class查找脚本?:FindObjectOfType<UiManager3>().SendMessage("ShowWhat", "主机");
FindObjectOfType<UiManager3>().SendMessage("ShowWhat", "主机");//如这里我想传给一个叫UiManager3脚本下的ShowWhat方法,传参类型是string类型
两种方法可以发送参数
使用Component.SendMessage发送
GameObject.Find(“需要传递到游戏对象的Name”).SendMessage(“脚本中的方法名称”,Object//传递的参数类型,SendMessageOptions.DontRequireReceiver//这句代码表示不需要请求返回参数);
如果使用Component.SendMessage,没有Find游戏对象而直接SendMessage参数就会报错have no receiver
得到游戏对象,给游戏对象添加组件
GameObject.Find((“需要传递到游戏对象的Name”).GetComponent<脚本名称>().脚本中的函数();
还有一个delegate方法,似乎比sendmessage效率要高,而且随时间发展稳定性也强。
把你要获取的变量权限定义为public类型变量.
以下方法任意-一个都可以:
public GameObject另一个物体; //监视面板拖拽赋值
另一个物体:GetComponent<脚本>().变量获得并更改.
将另一个物体命名为”XXX”:GameObject.Find(“XXX”).GetComponent<脚本>().变量;
三:将另-一个物体命名为”XX”;GameObject.FindGameObjectWithTag(“XXX”).GetComponent<脚本>()变量;
还有一个是定义静态参数变量的,呃,感觉好麻烦就算了
延时触发函数@
用 Invoke() 方法需要注意 3点:
1 :它应该在脚本的生命周期里的(Start、Update、OnGUI、FixedUpdate、LateUpdate)中被调用;
2:Invoke(); 不能接受含有参数的方法;
3:在 Time.ScaleTime = 0; 时, Invoke() 无效,因为它不会被调用到
一、InvokeRepeating(string way ,float time1 ,float time2 );
Way:你想要延时的方法名
time1:多少秒后执行
time2:重复执行时间间隔
二、Invoke(string way ,float time);
way:方法名
time:多少秒后执行
代码:
1 |
|
碰撞检测@
1 | void OnTriggerEnter2D(Collider2D other) |
项目:智能工厂@
服了 unity package里的东西得在package manager里导入到项目 否则不会显示
物体列表@
Unity3D游戏开发——物品存储:List与Dictionary
物体数组(GameObject[] list)@
1 | using System.Runtime.CompilerServices; |
int 转 String(显示点击次数)@
1 |
|
1 | using System.Collections.Generic; |
Unity 自行生成物体@
1 | GameObject go= new GameObject("Cube1"); |
1 | //在脚本中创建一个obj变量,并使用for循环通过Instantiate方法生成3个物体,使用Random的Range方法随机生成在x为0到10,y为1,z为0到10的区域位置。 |
实例化 & 销毁@
版权声明:本文为CSDN博主「lee图图」的原创文章,遵循CC 4.0 BY-SA版权协议,转载请附上原文出处链接及本声明。
原文链接:https://blog.csdn.net/lee514/article/details/80995048
实例化(Clone)@

1 | public GameOject m_prefab;//放置prefab |
Intantiate方法是静态方法,要用类名GameObject.调用。
第一个参数 Object是要生成的游戏物体//m_prefab:代表要传递的游戏物体
第二个参数Vector3是游戏物体的生成位置//Vector3.up:代表场景中原点上一米的位置
第三个参数Quaternion是表示生成的游戏物体是否旋转,一般是不旋转,用Quaternion.identity表示无旋转//Quaternion.identity:表示生成的物体无旋转
随机位置用Random.Rang(min,max)函数成成随机的x,y,z值就可以了
首先获得min和max的值:在场景中新建一个cube,拖拽cube测量场景长宽的min和max
销毁@
创建一个脚本DestoryBox—>添加到预制体Box上
1 | GameObject.Destroy(gameObject,2.0f); |
Destory是静态方法,用类名加点的形式调用
gameObject表示要销毁的游戏对象自身
2.0f表示2秒后销毁,可以任意指定时间
也可以用随机数函数生成随机的销毁时间,例如:Random.Range(1.0f,5.0f),表示1到5秒之间的秒数销毁游戏对象。
碰撞检测并销毁@
码,也可以看看下面。
碰撞检测需要刚体和碰撞盒。
销毁@
1 | GameObject obj= GameObject.CreatePrimitive(PrimitiveType.Cube); |
销毁一个集合中的所有物体:
1 | List<GameObject> goes = new List<GameObject>(); |
或者
1 | List<GameObject> goes = new List<GameObject>(); |
判断物体是否显示/销毁@
1 | if(GameObject.activeInHierarchy) |
查找/获取游戏对象+对象组@
unity3D之获取游戏对象的3种方法
获取游戏对象有三种方法:
1.通过对象名称获取:objCube=GameObject.Find("Cube");
1 |
|
2.通过tag标签获取单个游戏对象:objCube=GameObject.FindWithTag("Finish");
游戏对象(数)组@
添加和循环@
1 | private List<int> list = new List<int>(); |
1 | using System.Collections.Generic; |
3.通过游戏标签获取多组游戏对象:objCube=GameObject.FindGameObjectsWithTag("Finish");
如果一个数组A里存储n个游戏对象Enemy,当n个Enemy全部被销毁时,判定游戏胜利。
判断若数组A为空,就说明Enemy被全部销毁,则游戏胜利。C#支持Array.any()这个方法来判断数组A是否为空;但是游戏对象数组GameObject[]不支持这个方法。这个需要遍历一下数组A查看每个地址的值是否为空,因为数组是有长度的,每个元素是一个对象引用,数组本身是不知道引用是否为空的,只能自己遍历。
通过计算该对象身上有多少个子对象来判断该对象是否有子对象,但需要主意的是,gameObj本身也会被记录到Length之中,所以在判断gameObj对象是否有子对象时,应做如下书写(而不是写成==0);
1 | void Start () { |
以上代码转载https://tieba.baidu.com/p/6326766993?red_tag=3013601229
检查Tag物体组是否全部隐藏@
1 |
|
以下转自博主:Teng的世界 https://blog.csdn.net/teng_ontheway/article/details/47188141
1.GameObject.Find()、Transform.Find前置条件@
Unity中常用到查找对象,非隐藏的、隐藏的,各种方法性能有高有低,使用又有各种条件限制。
在此对查找的性能和条件进行分析。开发时遇到的主要问题是查找隐藏对象。
没有完美的查找方法,只有最合适的查找方法
最后附带上测试代码
2.相关API@
GameObject.Find
Transform.Find
GameObject.FindWithTag
GameObject.FindGameObjectsWithTag
Resources.FindObjectsOfTypeAll
2.1 GameObject.Find@
通过名字或路径查找游戏对象。
1 | GameObject.Find("GameObject"); |
使用规范:
1.无法查找隐藏对象
隐藏对象包括查找路径的任何一个父节点隐藏(active=false)
2.如果查找不在最上层,建议合理使用路径查找,路径查找是把双刃剑
**优点1:**解决查找中可能出现的重名问题。
**优点2:**如果有完全的路径,减少查找范围,减少查找时间。
缺点: 路径或结构调整后,容易影响到程序中的查找,需要重新定位查找路径。
3.如果路径查找中的任何一个父节点active=false,这个对象都将查找不到。
4.使用方便但效率低下
此查找相当于递归遍历查找,虽使用方便但效率堪忧,建议在Start()函数中查找对象并保存引用,切忌在Update()中动态查找。
2.2 Transform.Find@
1.可以查找隐藏对象
2.支持路径查找
3.查找隐藏对象的前提是transform所在的根节点必须可见,即active=true
1 | GameObject root = GameObject.Find("root"); |
实际开发:
实际开发中会将功能预制体放到一个可见的GameObject目录下,将这个GameObject目录作为查找根节点,下面的所有对象(隐藏、非隐藏)都可以查找到。
你可以把”map”节点放在一个active = true的MapRoot上,无论是关闭 或者 显示 代码中写起来都很方便。 假如你的map节点就是顶级节点,那么它一旦天生acive = false ,那么你将无法得到它的对象,更无法设置它的属性了。
1 | GameObject root = GameObject.Find("MapRoot"); |

2.3 其他查找@
GameObject.FindWithTag
GameObject.FindGameObjectsWithTag
使用极少,并无卵用
Resources.FindObjectsOfTypeAll
返回指定类型的对象列表。主要用于编辑器中,eg。检测内存泄露、批量查找的功能等
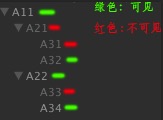
3 实际测试@
目录结构如下,绿色代表现实,红色代表隐藏
1 | void Start () { |
4 即使隐藏root节点gameObject也能进行查找的方法@
找到了一个即使隐藏root节点gameObject也能进行查找的方法。
http://answers.unity3d.com/questions/52560/gameobjectfind-work-on-inactive-objects.html
代码预览:
1 | GameObject[] pAllObjects = (GameObject[])Resources.FindObjectsOfTypeAll(typeof(GameObject)); |
文本代码控制@
1 | this.gameObject.GetComponent<Text>().text= "<color=#0000ff><size=60>小明</size></color>送了<color=#0000ff><size=60>小红</size></color>一辆游艇"; |
Follow@
挂在物体上,obj是其要Follow的对象。
1 | using System.Runtime.CompilerServices; |
Unity 基于坐标显示物体@
挂在空物体上。
1 | using System.Runtime.CompilerServices; |
unity 获取和设置gameObject(和玩家)的坐标@
1 | // 获取Player变量指定的对象的三围坐标 |
(来源网络)
判断物体方位和自身方位关系@
前后左右上下@
1 | 1.在自身的前后: |
————————————————
版权声明:本文为CSDN博主「z_mg_」的原创文章,遵循CC 4.0 BY-SA版权协议,转载请附上原文出处链接及本声明。
原文链接:https://blog.csdn.net/z_mg_/article/details/79362217
平面圆/椭圆内@
1 | /// <summary> |
————————————————
版权声明:本文为CSDN博主「我虽浪迹天涯」的原创文章,遵循CC 4.0 BY-SA版权协议,转载请附上原文出处链接及本声明。
原文链接:https://blog.csdn.net/qq_42541751/article/details/117847361
毕设:Hololens使用Unity开发App@
理论部分的逻辑思路:@
1、描述虚实系统的相关基本概念,总结前人陈述
2、对现有可交互的人机物虚实系统进行分析(AR头显、AR眼镜)(较浅显)
3、在这些系统中针对HoloLens的虚实系统操作模式进行详细分析和体验(深入)
4、根据以上研究分析得出目前的虚实系统存在的缺陷(较浅显)
5、使用基于装配场景需求调研的界面设计,来展示和探索、验证HoloLens现有交互模式的缺陷及改进方向(这一步作为实验)(深入)
6、总结和展望未来的虚实系统交互模式,提炼虚实系统操作模式(HoloLens级别)
(更强调虚实系统操作模式的分析与展望)
【现在想到的就是将GUI的按钮、平面元素淘汰,替换成同等概念的、非点触式的立体模型(三维的摇杆)、语音(语音几乎没有可以发挥的余地)、手势、动作等,或者组合以上方法产生新的交互命令,结合人在日常生活中的行为进行操作定义,例如拿起一个东西放在眼前的动作,可以定义为查看详细的功能操作,但具体实现目前就只能先展望一下】
目前的逻辑:@
1、描述虚实系统的相关基本概念,总结前人陈述
2、对现有可交互的人机物虚实系统进行分析(AR头显、AR眼镜)(较浅显)
3、在这些系统中针对HoloLens的虚实系统操作模式进行详细分析和体验(深入)
4、根据以上研究得出应如何设计该交互模式下的界面设计,提炼界面设计方法理论(HoloLens App级别)(理论雏形)
5、使用基于装配场景需求调研的界面设计,来验证这一设计方法(这一步作为设计、验证和理论优化)(理论迭代)
6、总结和展望未来的虚实系统交互模式下的界面设计(HoloLens App级别)(理论成形)
(更强调界面设计和界面设计方法)
【这个写的主题就是在类似于Hololens的虚实系统下应该如何进行界面设计,就涉及到距离、三维信息呈现、主动与被动那些,也在界面设计部分有提到是如何使用这些理论进行设计的】
修改思路:@
保留界面设计理论部分,加入虚实操作系统理论分析及展望部分。两者也可以适当进行融合。
界面设计demo那里用现在做出来的替换之前本应是迭代的那部分。对比在虚实交互系统中GUI较多(做了可用性测试)的结果和GUI较少的结果
1、描述虚实系统的相关基本概念,总结前人陈述
2、对现有可交互的人机物虚实系统进行分析(AR头显、AR眼镜)(较浅显)
3、在这些系统中针对HoloLens的虚实系统操作模式进行详细分析和体验(深入)
4、根据以上研究得出目前的虚实系统存在的缺陷,同时拓展应如何设计该交互模式下的界面设计,提炼界面设计方法理论(HoloLens App级别)(理论雏形)(较浅显)
5、使用基于装配场景需求调研的界面设计,展示和探索、验证HoloLens现有交互模式的缺陷及改进方向(作为实验)(深入)(理论迭代),同时拓展提及界面设计方法思路,但不作为重点
6、总结和展望未来的虚实系统交互模式,提炼虚实系统操作模式(HoloLens级别),略微拓展未来的虚实系统交互模式下的界面设计(HoloLens App级别)(理论成形)
建立环境@
要是开新工程估计还得看官方文档再来一遍,太麻烦了,导入啊什么的都好(官方最近也提供了辅助程序)但是后面的一通设置给我彻底心态搞没了。
用3D模板新建项目
切换平台至Universal Windows
导入TMP(在菜单的Windows标签下)
导入MRTK包- Selected package Mixed Reality Toolkit Foundation 2.5.3 is presented, along with its dependence package Mixed Reality Toolkit Standard Assets 2.5.3 in the Import Features window.-到项目目录
Mixed Reality Toolkit > Utilities > Configure Unity Project 接受设定
! Set default Spatial Awareness layer: Creates a Unity Layer named Spatial Awareness and configures MRTK to use this layer for the spatial awareness mesh. ( Project settings > Tags and Layers )
Player > XR Settings and check the Virual Reality Supported checkbox then click the + icon, and select Windows Mixed Reality to add the Windows Mixed Reality SDK
In the MRTK Project Configurator window, use the Audio spatializer dropdown to select the MS HRTF Spatializer, then click the Apply button to apply the setting:
In the Project Settings window, select Player > XR Settings, then use the Depth Format dropdown to select 16-bit depth:
In the Project Settings window, select Player > Publishing Settings, then in the Package name field, enter a suitable name, for example, MRTKTutorials-GettingStarted:
添加Scenes到bulid, 生成build, 在vs里打开sln文件, Configure Visual Studio for HoloLens by selecting the Master or Release configuration, the ARM64 ( Hololens模拟器设置成X86或X64,实机设置成Release,ARM64) architecture, and Device as target, select Debug > Start Without Debugging
部署时报错“找不到SDK“WindowsMobile””,在解决方案资源管理器中找到 [项目]>引用>Windows Mobile(带黄色感叹号)直接右键删掉
加回的方法:
编辑工程文件,添加:
1 | <ItemGroup> |
Unity 学习@
NameSpace(报错)@
还没有系统性学习,似乎是script上面那些using…而且和右侧Inspector里挂载的script的name有关。就this.gameObject.GetComponent
碰撞@
刚体和碰撞器@
只有安装刚体组件的物体才能受重力等作用力,只有安装碰撞器组件才能检测碰撞并运行函数,通常情况下需要相互作用的两个物体都要安装碰撞器.
A受重力与B发生碰撞:
无效碰撞有:
- A[刚体] x B[刚体]B于y轴锁定
- A[刚体] x B
搭配函数使用的有:
- A[刚体] x B[碰撞器]
- A[刚体|碰撞器]x B[刚体]
- A[刚体] x B[刚体|碰撞器]B于y轴锁定
直观有效也可调用函数的有:
- A[刚体|碰撞器]x B[碰撞器]:B不运动.
- A[刚体|碰撞器]x B[刚体|碰撞器]B于y轴锁定:B受碰撞力运动.
碰撞检测@
(Script挂在X物体上,即X的碰撞)
- ** OnCollisionEnter(Collision collision)**:检测碰撞开始并运行函数内容(只运行一次).
- ** OnCollisionExit(Collision collision):**检测碰撞结束并运行函数内容(只运行一次).
- ** OnCollisionStay(Collision collision):**检测碰撞并运行函数内容(接触时持续运行,每帧一次).
取得碰撞信息
- ** collision.collider: **获取碰撞物体
- ** collision.collider.name:**获取碰撞物体名称
- ** collision.collider.tag:**获取碰撞物体标签
触发@
** 可以穿过的碰撞器:**将碰撞器中的”Is Trigger”勾选.
** 将触发器隐藏:**移除mesh filter和mesh render
触发检测@
** OnTriggerEnter(Collider other)**:检测碰撞开始并运行函数内容(只运行一次).
** OnTriggerExit(Collider other):**检测碰撞结束并运行函数内容(只运行一次).
** OnTriggerStay(Collider other):**检测碰撞并运行函数内容(接触时持续运行,每帧一次).
** 取得触发信息**
(other相当于一个collider)
** other:**获取触发(游戏内)物体
** other.name:**获取触发物体(游戏内)名称
** other.tag:**获取触发物体(游戏内)标签
鼠标射线@
射线检测@
Input.GetMouseButtonDown(鼠标左键) //检测鼠标左键按下
Ray ray = Camera.main.ScreenPointToRay(屏幕坐标转换成射线)(Input.mousePosition(鼠标位置)**//定义射线**
RaycastHit hit;**//定义射线击中的点,保存碰撞信息**
If(Physics.Raycast(ray(传递射线),out hit(传递射线碰撞信息)))//检测是否发生碰撞
{
Print(hit.point);//输出击中位置
}
摄像机跟随@
- 原理:使摄像机与人物保持一个固定的方位偏差
确定初始化相机跟随位置
- 创建Script,置于Main Camera上
Public Transform hero;**//定义Transform组件**
Private Vector3 offset;**//定义偏移数据变量**
Start下:
Offset=transform.position-hero.position;//计算偏移数据
Update下:
Transform.position=offset+hero.position;**//更新相机位置**
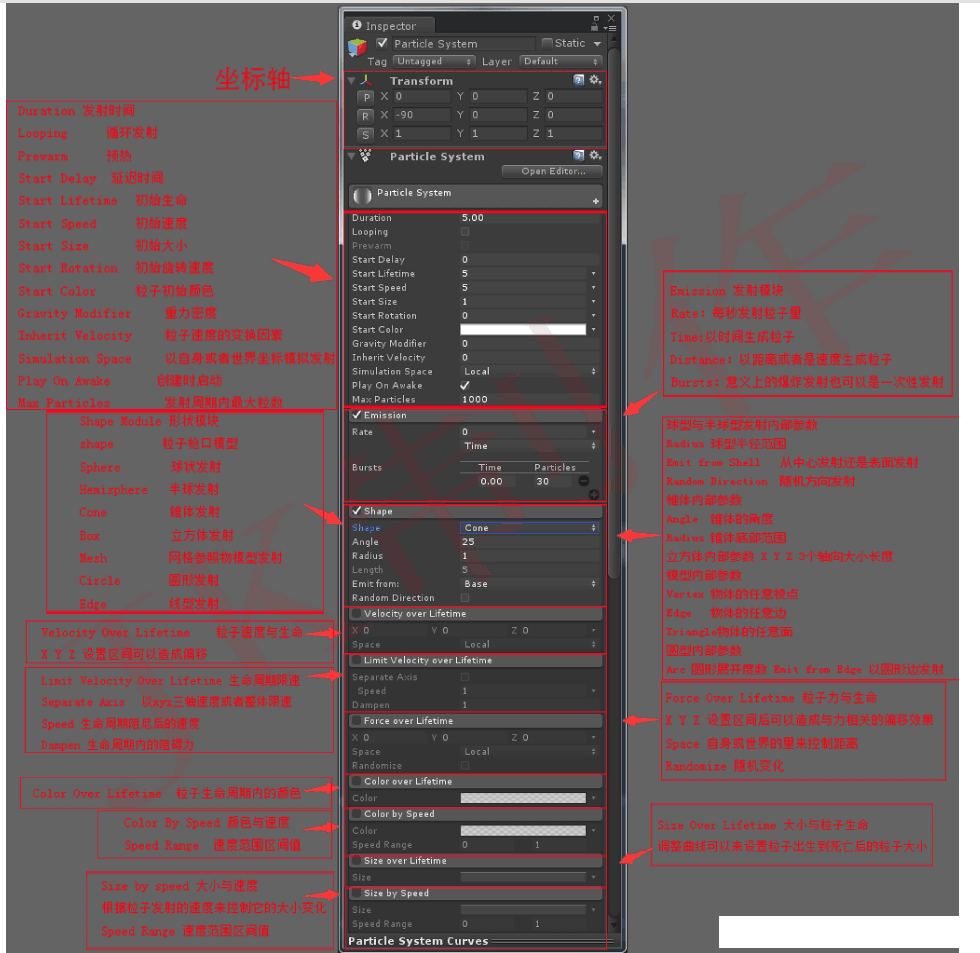
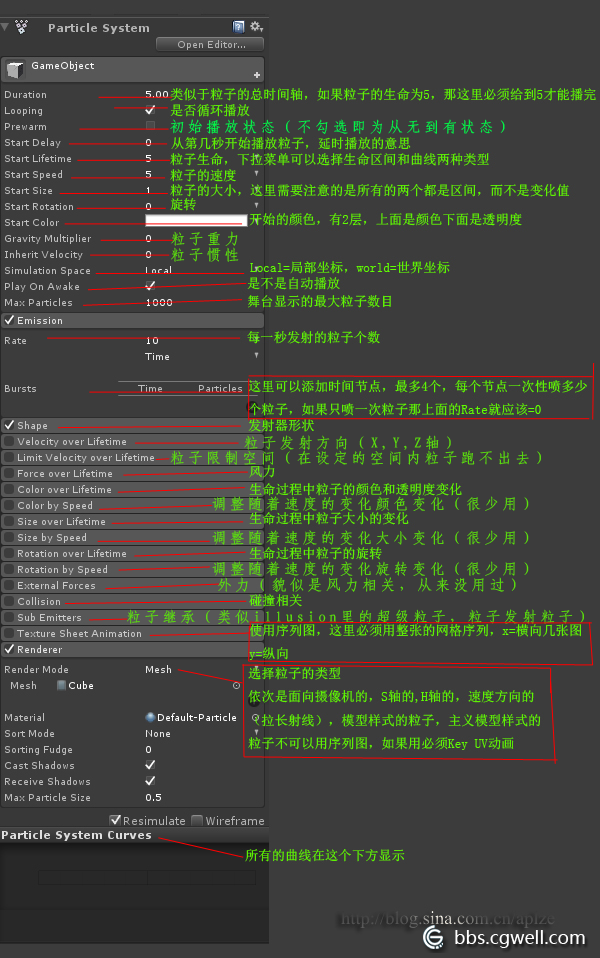
粒子系统@
DontDestory@
虽然有很多bug,但是挺方便的。
1 | public class DontDestroy: MonoBehaviour { |
可以配一个Manager来具体控制。
1 | using System.Runtime.CompilerServices; |
添加脚本/脚本系统@
Script以Hololens为例,C#,挂载到希望交互的物体上。
- “grabbable” Near Interaction Grabbable
- “manipulation” Manipulation Handler(de)/Object Manipulator
- “bounding” Bounding Box(de)/Bounds Control
- Interactable 可交互组件(focus)
挂在空物体的情况就是该物体一出现就开始运行Script,和unity monobehaviour中的场景的Start()和Awake()类似。
Script编写@
引用@
包括部分Hololens的引用
1 |
|
类名(文件名)@
public class classname: MonoBehaviour {
变量定义@
public:
1 | public float countTime = 0f; |
会显示在Unity控制面板中,可以查看以及自定义更改;
private:
1 | private Vector3 arrow_postion; |
不会显示在Unity控制面板中;
Unity提供的变量类型@
遇到的比较特殊的就是Vector3、GameObject其他都比较正常,,,
Unity提供的变量名@
Time.deltaTime是激活后的运行时间。
GameObject.FindGameObjectWithTag("Arrow1").transform.position;是找到tag为Arrow1的物体的位置属性数据。
this.GetComponent<Transform>().position是挂载该脚本的物体的位置属性。
MonoBehaviour@
1 | // Use this for initialization |
变量声明@
例如new Vector3(arrow_postion.x, arrow_postion.y + 0.08F, arrow_postion.z);可以在不用提前定义变量的情况下使用…吧?
其实new这个我一直没太搞懂。
函数@
1 | void CountTime() |
Unity提供的函数@
print("Ready to go!");可以在console打印出文字。
SceneManager.LoadScene(6);可以跳转场景。
DontDestroyOnLoad(this.gameObject);跳转场景时不销毁挂载这个script的物体。
object1.SetActive(true);显示隐藏物体。
obj.SetActive(!obj.activeSelf);物体隐藏则显示,显示则隐藏。通常需要挂在另一个已激活/显示的物体上,因为隐藏的物体无法自启。
某Object挂载脚本时,获取Player信息、指定Object、Tag-Object与获取本Object@
Player:
1 | Vector3 player_postion = Player.transform.position;//获取Player |
指定Object:
1 | public GameObject obj;//界面上现场指定一个Object,代码内命名为obj |
获取本Object:
1 | this.GetComponent<Transform>().position.x//获取本Object相关信息 |
获取tag-Object:
直接调用。
1 | GameObject.FindGameObjectWithTag("Arrow1").transform.position//获取Tag-Object相关信息 |
自学Unity2d@
bug:现在几分钟之内就会闪退,我尽力了,不管了,还要搞科研(瘫)
bug:不稳定,会闪退(尤其是开音乐会的时候。可能是他们玩太high了)
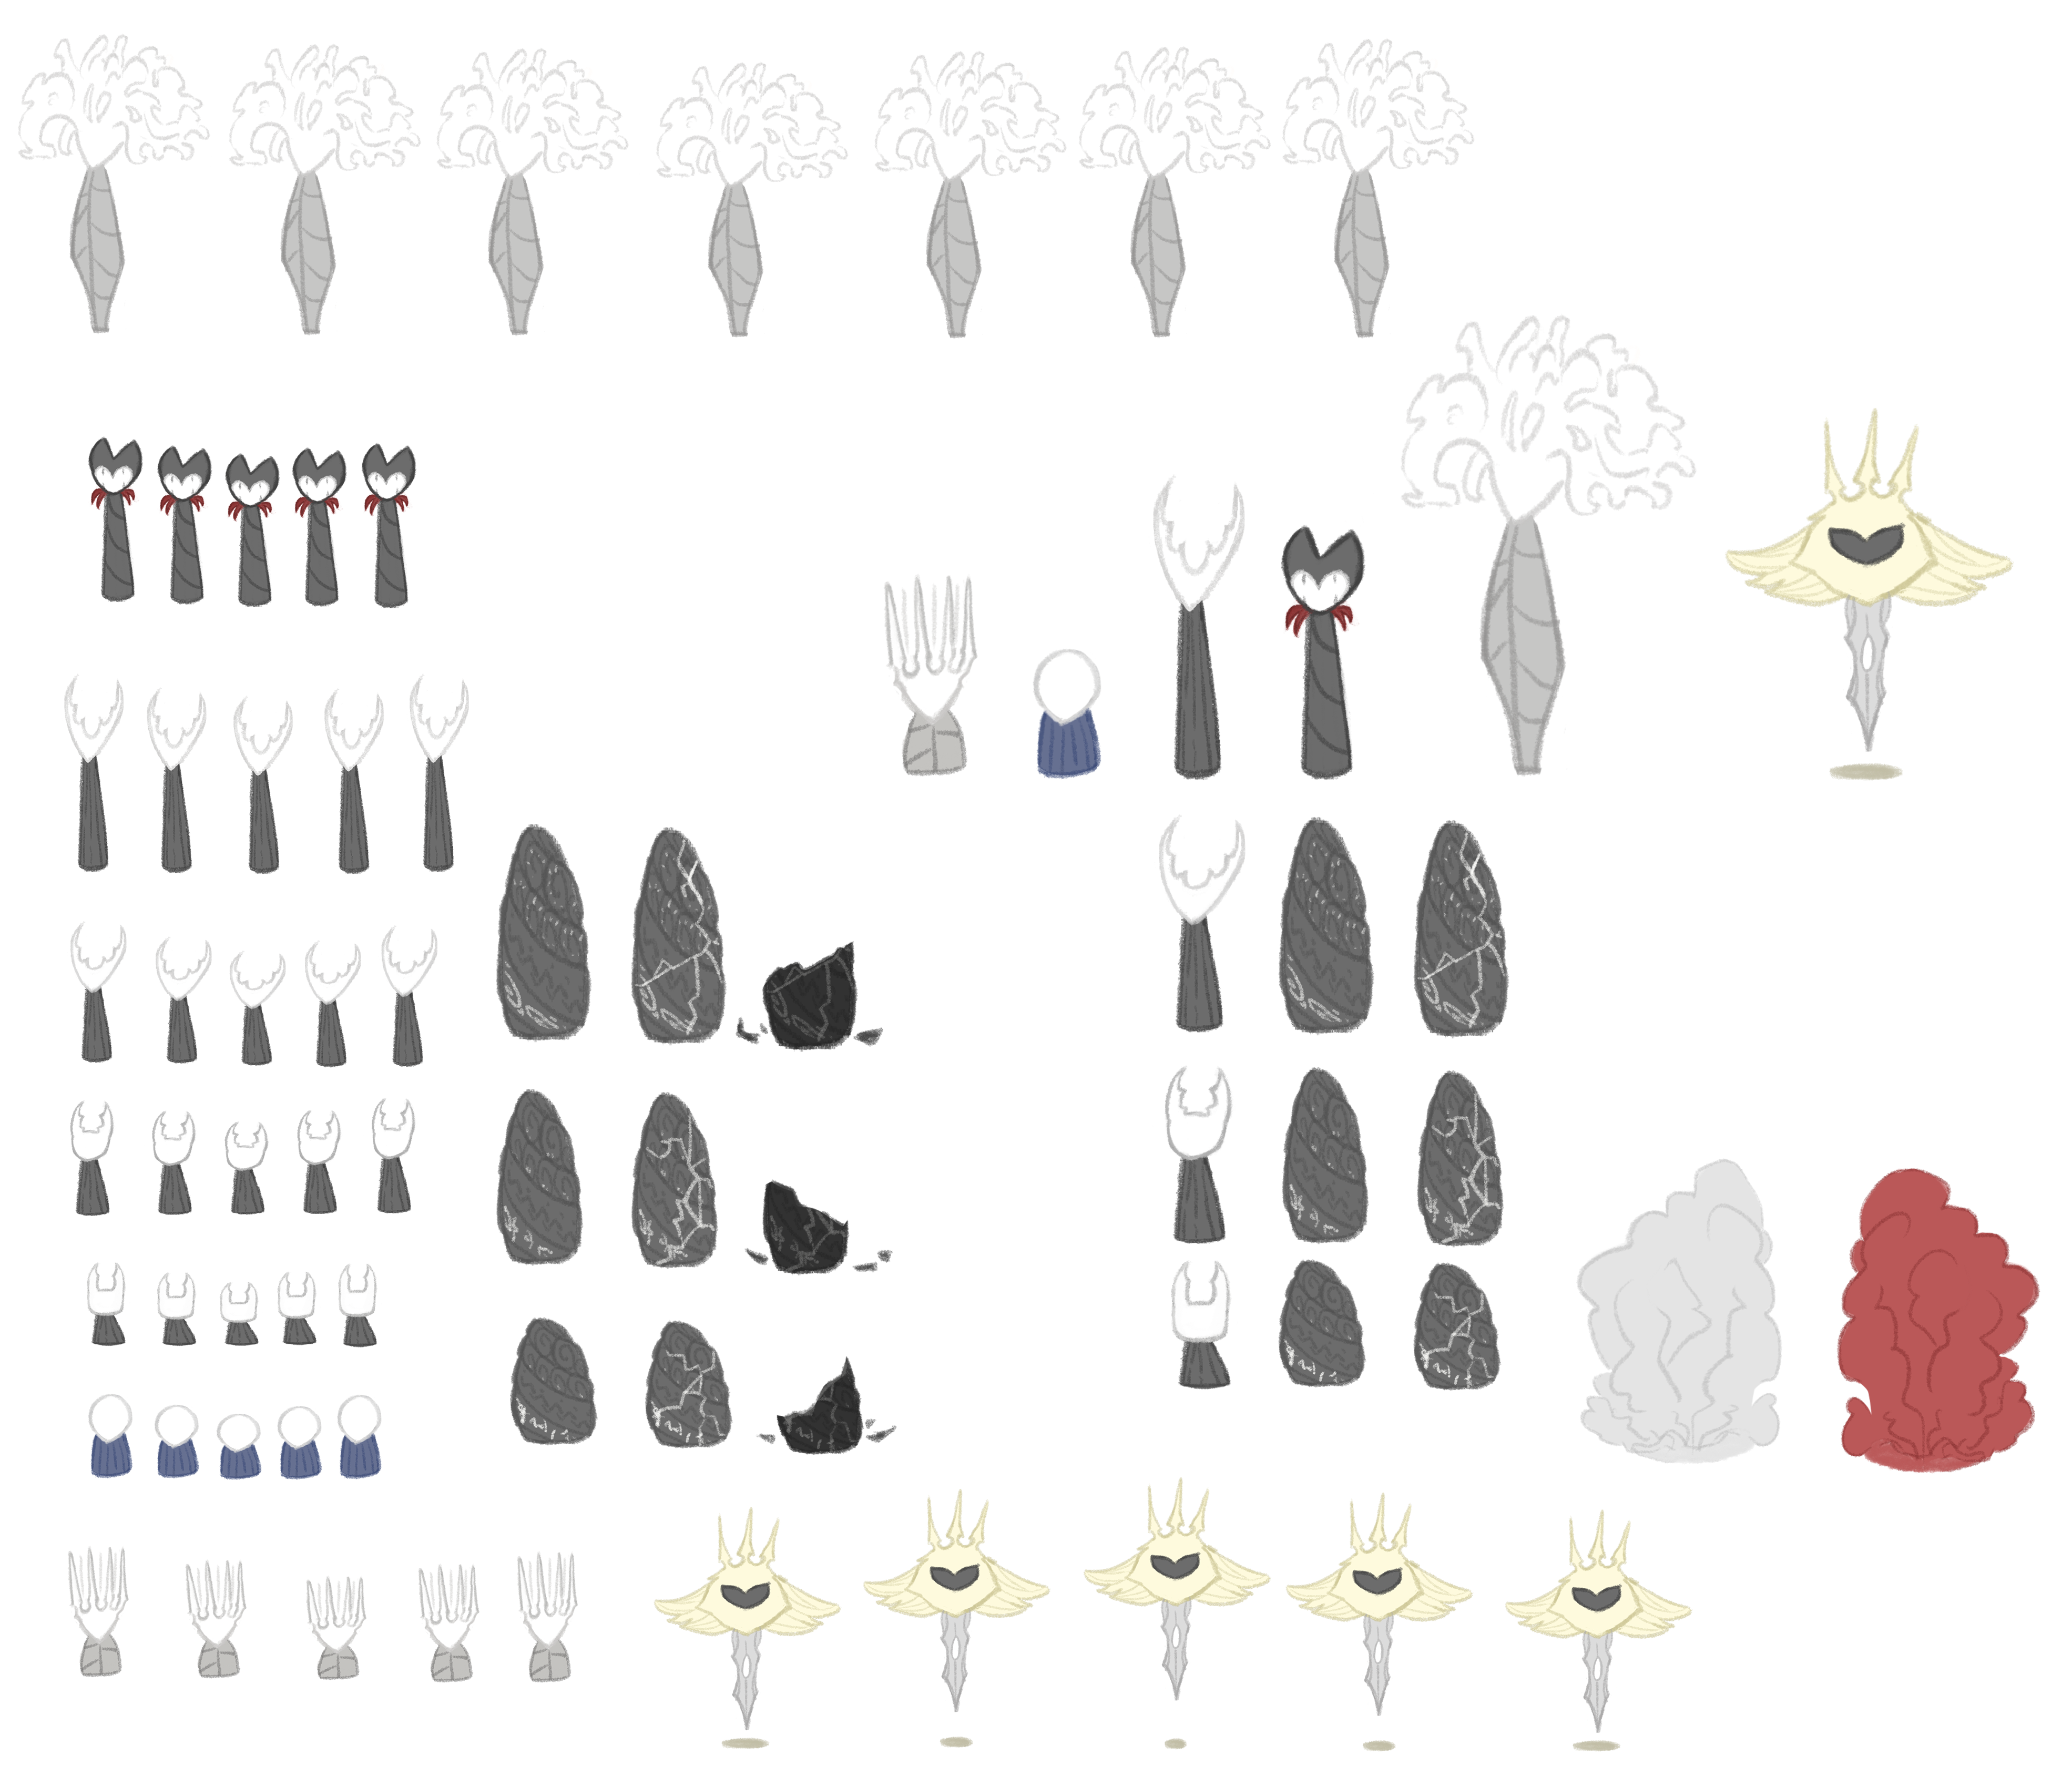
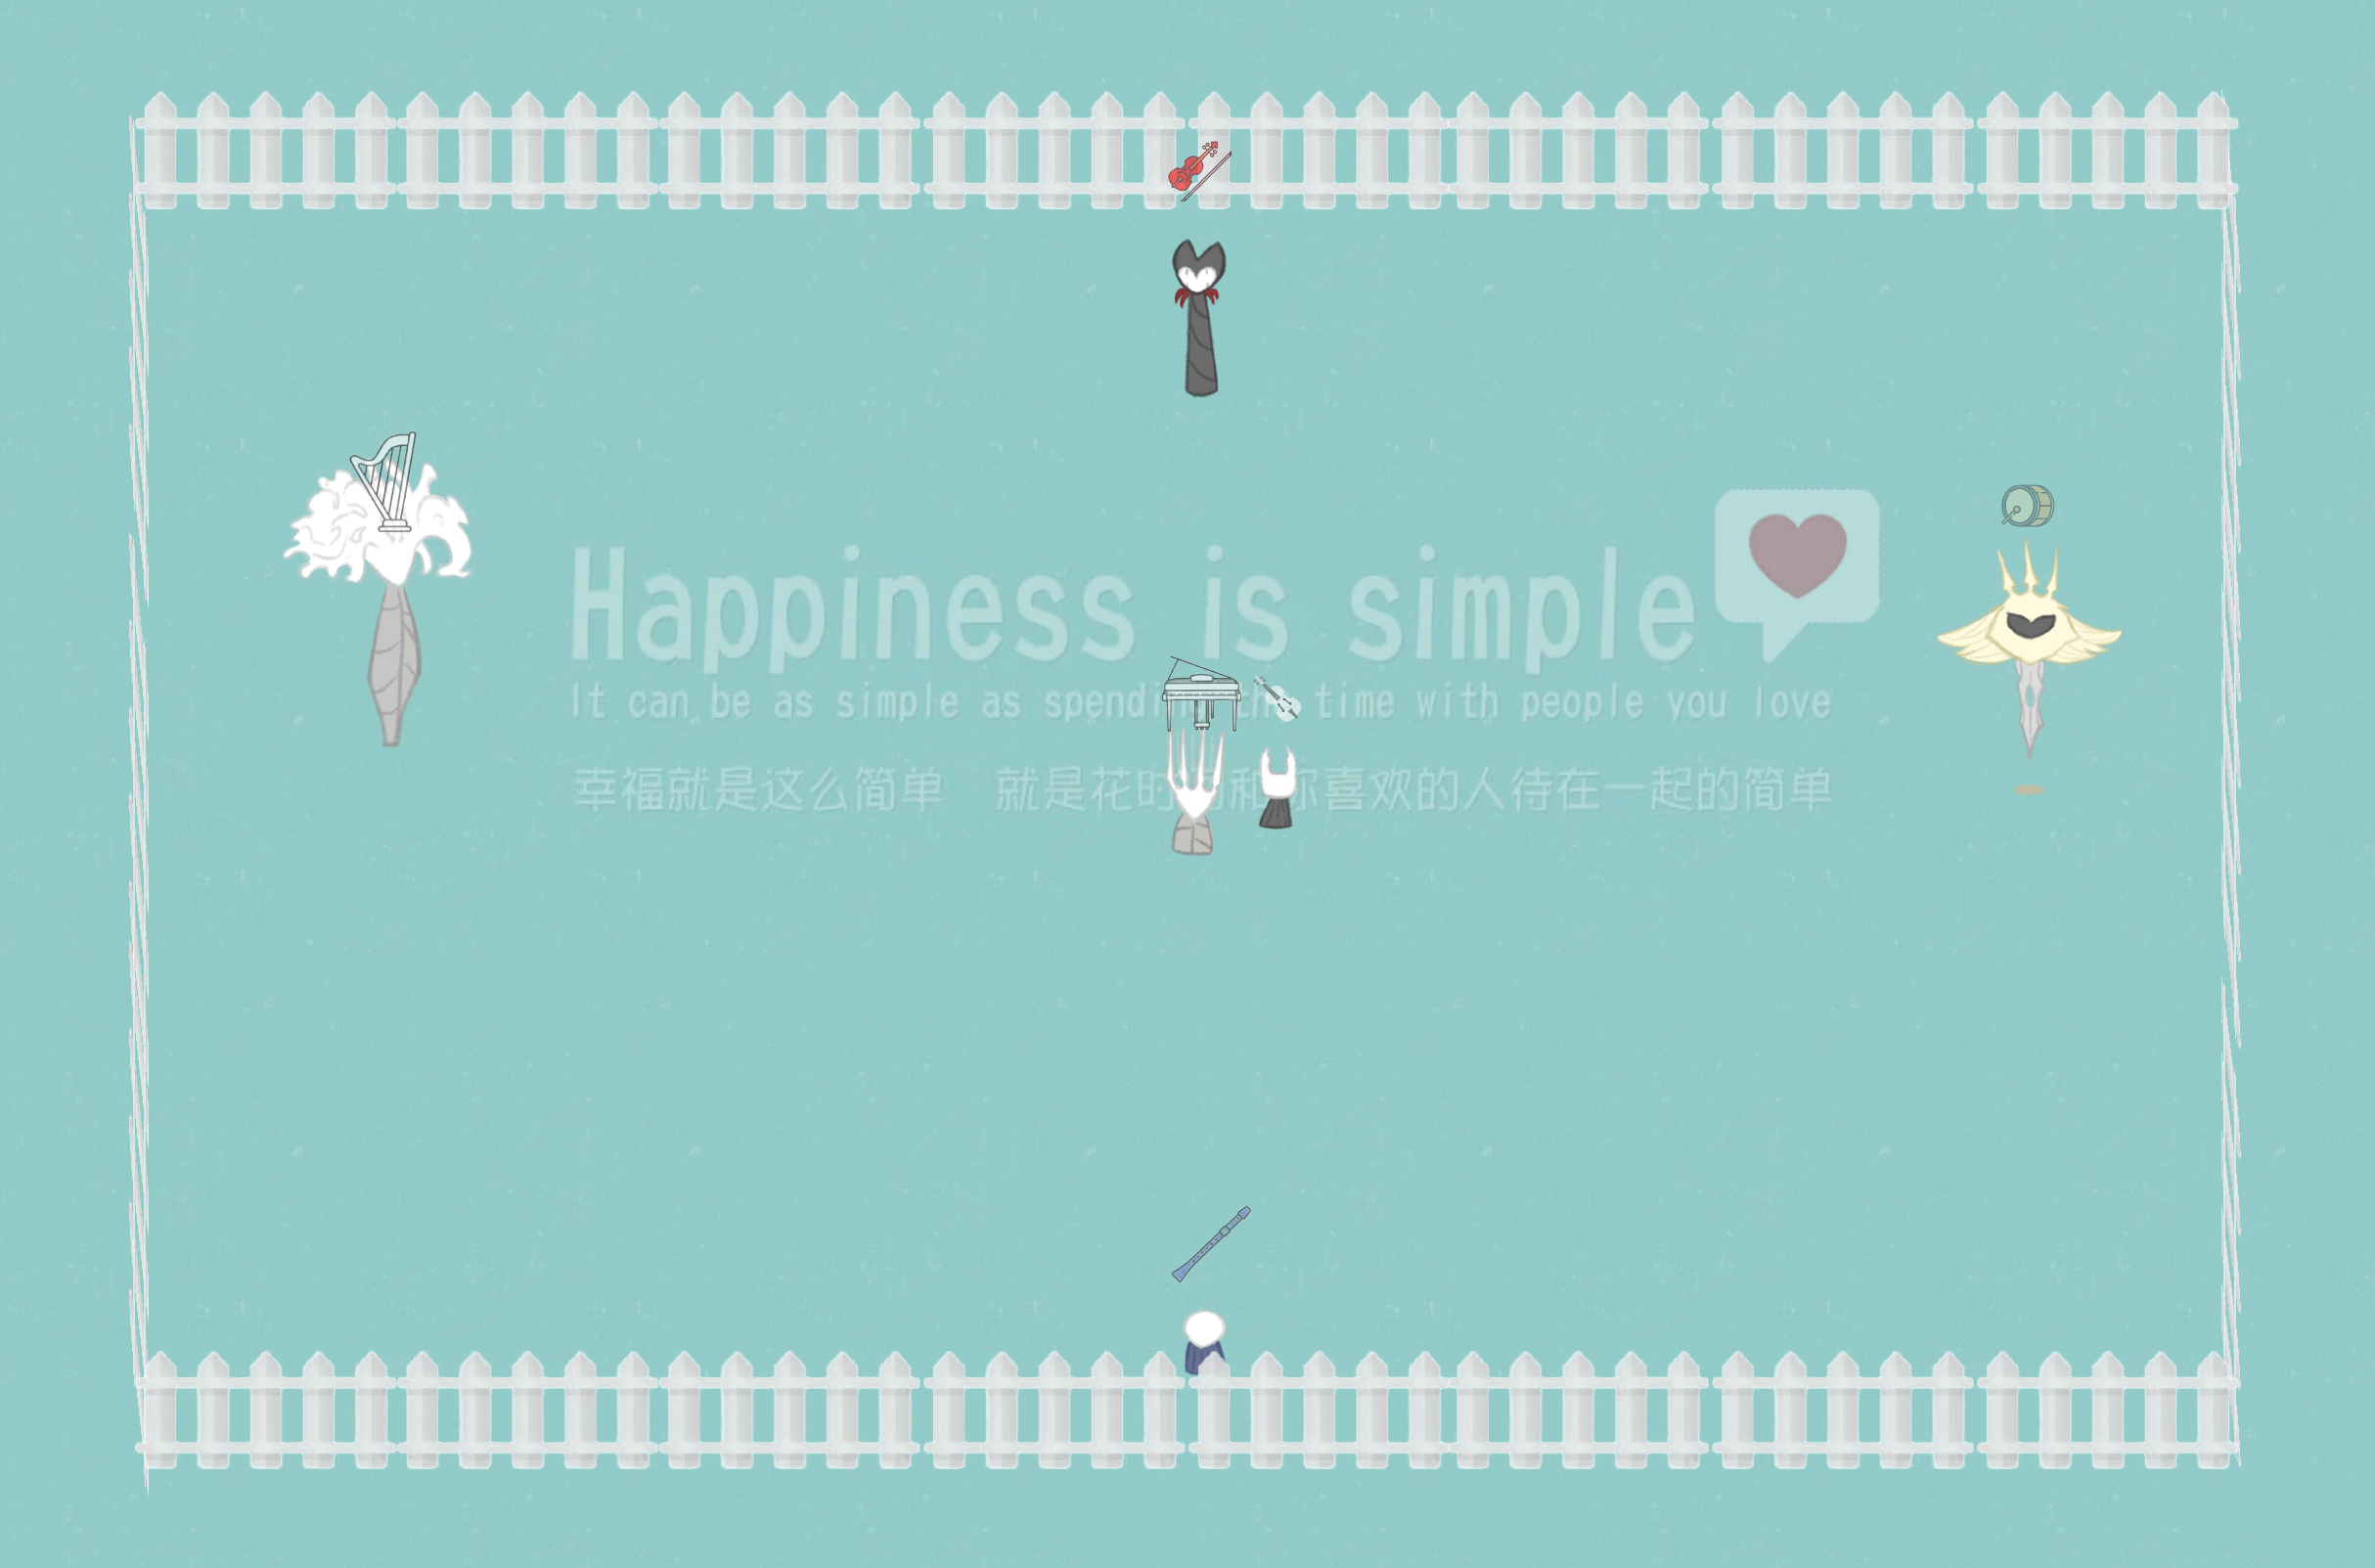
心血来潮模仿手游(其实就是姜饼人)做的圣巢培养观察箱。
出一些设定备忘@
23.3.9忽然又看到这个项目,出一些设定备忘
其实可以改动的只有两个方面:
- 新的表情
- 新的演奏音乐
其中新的表情没啥好改的了,已经加的差不多了(而且要改的话会超级复杂,因为涉及到加入图片、调整图片动画、调整参数,要改一堆相关Script(尤其是角色Emo.cs),而且我也差不多忘了怎么加了)
新的演奏音乐的话,就是在musicList的物体中的list拖入一个新的音乐(音乐文件要提前放进music文件夹),在Script的文件夹下,打开musicControl改变range数值:
1 | musicCode = Random.Range(0, 5); |
然后如果需要演出效果的话可以在Script - Emotion的文件夹里找到对应的角色Emo.cs加入代码函数、编辑相关参数(比如下例是让夫人在15秒的时候开始浮现出话筒图标(开始独唱)):
1 | public void concert(){ |